A few years ago I had lots of snow in my backyard. I had heard of building a snow dome in a backyard, so I recruited a scout troop to come and help me build a snow dome in my own yard. I had sold the idea to one of my producer on a National Show ABC Show called “The Home Show.”
After we made the snow dome, the show’s producer asked me to sleep in it. I spent a few hours taking out sleeping bags and quilts so that I would not freeze during the night. Finally the night came for my overnight adventure. I did not freeze, and furthermore I did not even get cold. As the night went on I took off all the quilts and soon fell asleep with just a heavy sleeping bag.
Building A Snow Dome
If you have a fair amount of snow and some kids who like adventure, you will not want to miss this. I loved what I learned and I love the adventure that a few scouts and I created right in my backyard.
Snow is a good insulator, and as William O. Douglas said:
One has to lie deep in the snow to learn how warm and protective it is. A den in the snow confines the body heat like a blanket or overcoat. It is a snug place, no matter how the wind may howl. One who holes up in the snow understands better the mysteries of the woods in the winter. He knows why the severe weather grouse squirm their way under soft snow and be quiet. He understands why deer bury themselves in drifts, lying a half-day or more with just their heads sticking out. He learns something about the comfort of the bear in hibernation.” (Quoted from The Boy Scout Fieldbook, 3rd edition, page 330, Irving, Texas, 1984.)
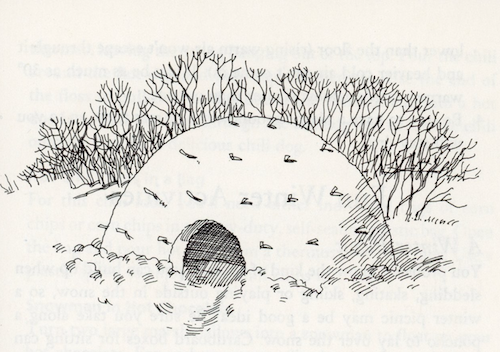
To build a snow dome, you’ll need thirty 10-inch sticks or dowels painted black on one end, a sturdy shovel and some patience. Begin making the snow dome by shoveling a mound of snow about 6 feet high and 10 to 12 feet in diameter at the base.
If you’re at home and have a snow blower, this can be done very quickly. Simply start walking in a large circle, gradually blowing all the snow to the center.
Once the snow is all piled up, push all the sticks (painted end first) into it at about 18-inch intervals, pointing toward the center. Let the mound set for at least 2 hours, though overnight would be better. This will allow the snow to settle and consolidate.
Using your shovel, cut a 2-foot-high entrance to the mound as close to the ground as possible. Start hollowing out the mound, piling the snow at the side of the entrance as a wind barrier. Continue digging until you see the ends of the sticks. You should now have a roomy, peaceful shelter.

Snow Cave
A second type of shelter you can build is the snow cave. It uses the same principles as the snow dome, except that it is built in deep drifts or steep, stable snow slopes. If you decide to build this type, however, please be aware of extreme avalanche danger.
Begin by digging a tunnel in the drift, angling it upward several feet. Excavate a dome-shaped room at the top of the tunnel following the same techniques as for the snow dome, using sticks pushed into the drift to indicate the thickness. Smooth the curved roof to remove sharp edges that may cause moisture to drip on you.
Before you sleep in your snow dome or cave, follow these safety precautions:
- Punch out a few holes at a 45° angle to the floor with a ski pole or long stick for ventilation. Occasionally check to make sure these holes are still open and that drifting or blowing snow has not blocked them.
- Never burn a stove or lantern inside as many give off poisonous carbon monoxide gas. Also, they use up available oxygen. Do all of your cooking outside.
- You may use candles inside your shelter for light and warmth.
Well, there you have one of my favorite adventures. My snow dome lasted all winter and did not go away until the spring thaw.
